Tuesday 24 March 2015

Pre-Easter Sculpting

Today Tasmin finished the gum tape prototype of the hyena mask. It feels fairly solid, but has taken many hours of layering to get a good level of strength. Because of this, I don't know if it's a viable way of making the ten hyena masks we have been asked to, even after the list got revised, and the grass head dresses and a few of the other animals got cut out for budget reasons.
If the mask is removed without enough layers of tape, it is wobbly - no good at all. With all of the layers on, it has to be cut off the sculpt to be removed, then gum taped back together. It currently has no eyes! I will need to add these to the sculpt before we solidify how we are going to make the actual masks.
We continued sculpting, Nala being done by Andrea and the cheetah being done by Rhian. I helped both with some feedback and Rhian asked for me to help flesh out the shape in a way that corresponded to the concept art well. I enjoy sculpting and find the biggest challenge with it to be getting the sculpt symmetrical - having multiple people working on really helps, because there is always a fresh set of eyes to pick out any imperfections.
I managed to get Nala finished in time for the easter holidays, with Claire having finished Scar and Esme having made great progress on Mufasa. Simba is also underway but due to a lack of headform to sculpt him on, he is currently a little flat. I am hoping that I will be able to source a headform for him to sit on over easter.
Scar, completed and looking suitably moody.
Nala, completed.
Mufasa, nearing completion. 
Simba, who is a little flat at the moment.
Becca and Ollie have begun cutting out the head for Pumba using a cardboard stencil on polystyrene, and maquettes have been sculpted for the zebra (Naomi, Ollie) and antelope (Lorraine). Jake finished soaking a bundle of willow, which is now ready to use, and Shona is busy creating an antelope's body from styrofoam. I'm not sure how she plans to duplicate it as carving takes a long time - just like the hyena, we will have to refine the process.

Monday 23 March 2015

Withies & Hyena Struggles

Today started out with a quest for willow withies. Whilst we initially thought we'd have to order these, we found out the university had quite a large stockpile that we could just replace nearer the end of the project. This meant that we could jump straight into soaking them, without having to worry about waiting for them to arrive.
Without the professional equipment (aka a bathtub) required so soak willow's full length unbent, we had to resort to using a large plastic bin. By soaking the bottom half of the withies first, we were able to bend them to fit entirely in the bin with a weight and a piece of MDF on top to keep them all in.
We plan to use these withies for sculpting the elephant's face and body, and the giant mufasa head's separate pieces, to be formed and held together by the child actors.
We also began sculpting on the armatures we'd found and made. Rhian started on the cheetah, Andrea started on Nala and I did some work on the hyena on a sheet of MDF. It wasn't important for the hyenas to be on a 3D armature because they weren't masks to go on a hat - the design showed them as hand held puppet heads, with a fabric drape and mane reaching up to the child's head. This also worked well for the children - being young, they didn't have to worry about having a weighty mask on their head, or not being able to see well enough.
The Armature. It doesn't look much more than a blob of foil, mainly because it was. It's purpose was to give the sculpt structural integrity and to use up less clay.
My design for the hyena's face.
In the afternoon I met with Amy, Andrea and Lorraine to discuss materials with Fiona. There were some things we were definite about - such as the elephant being made out of willow withies with a fabric covering - but others remain up in the air awaiting prototypes. After some discussion we set out on a mission to make some material prototypes. I finished the hyena sculpt that day in order to be able to experiment with materials on it. I finished the day by typing up a materials list for each of the animals that was as comprehensive as I could make it at the time.
The sculpt after some intensive work on it.
After I had finished the hyena sculpt, I tried out some ideas for easily replicating the masks. This proved challenging and I was battling with the hyena until the university shut in the evening.
 

Above is the sculpt with clingfilm applied to keep it moist, and a couple of layers of masking tape over the top. Drawing on the shapes helped to emphasise how the mask would come out, and I felt it matched my concept art well. However, it was problem solving on how to actually sturdily and cheaply replicate this sculpt that was puzzling.
The masking tape pattern after being removed from the sculpt.

I decided to cut the pattern into the pieces I'd drawn on and tried to cut the shapes out of cardboard to see if we could glue them together to form the mask. However, I found the cardboard too rigid by nature, and getting it to fit together was a challenge that was taking far too long. Had we received the training for it, my dream way of making all of the masks in this project would be to sculpt them on the computer and render them in a low-poly style, then use software to 'unfold' the sculpts into a 2D pattern to be cut out of our chosen flat material.
The cardboard lower jaw sitting below all the other pieces. As you can see by the way it sits, the tape pattern is rather rounded and curved due to the nature of hand sculpting clay. The lower jaw sits very rigid.
With the failure of the cardboard mask being put behind, I ended my evening with another layer of clingfilm and started gum taping on the mask. This preserves the shape very well - and we will see how sturdy it is after a few layers.


Friday 20 March 2015

A Quick Update


Today was spent designing and reflecting on how to sculpt the masks. I started by investigating our options on sculpting materials, and after a lot of hassling staff found out that we could have free use of the scrap clay from the clay rooms - this clay was wet buff clay with the occasional lump of hard clay in it; perfect for our purposes, since we didn't need a highly polished finish due to the nature of how we planned to create the masks.
I also investigated what we were going to build the masks on. After a quick visit into town I bought 4 baseball caps in a sale, with them being only 50p each. It made sense for the lions to be built onto them, as they were cheap, sturdy and adjustable. We could either glue or, preferably, sew the masks directly onto them.
We found a few life casted heads to sculpt some lions on - this was the perfect set up, however there weren't enough for all of the animals - so I also came up with a way of padding out a plastic bucket with foil to make a decent base for sculpting on.


Thursday 19 March 2015

Hayley's Visit: The Adoption of Simba

There was a bit of a mad rush before Hayley arrived to get all of our designs coherently together and mounted in a way that look professional - we also tidied up the studio. When Hayley arrived, she was very happy to be there - she adored our designs, and even looked a little teary when we gave her the baby Simba to show her students. It was incredibly reassuring that she was so happy with where we'd got at that point on the project. This spurred everyone on to work really hard - immediately after the meeting we sat down and worked out who wanted to do each element of the project.
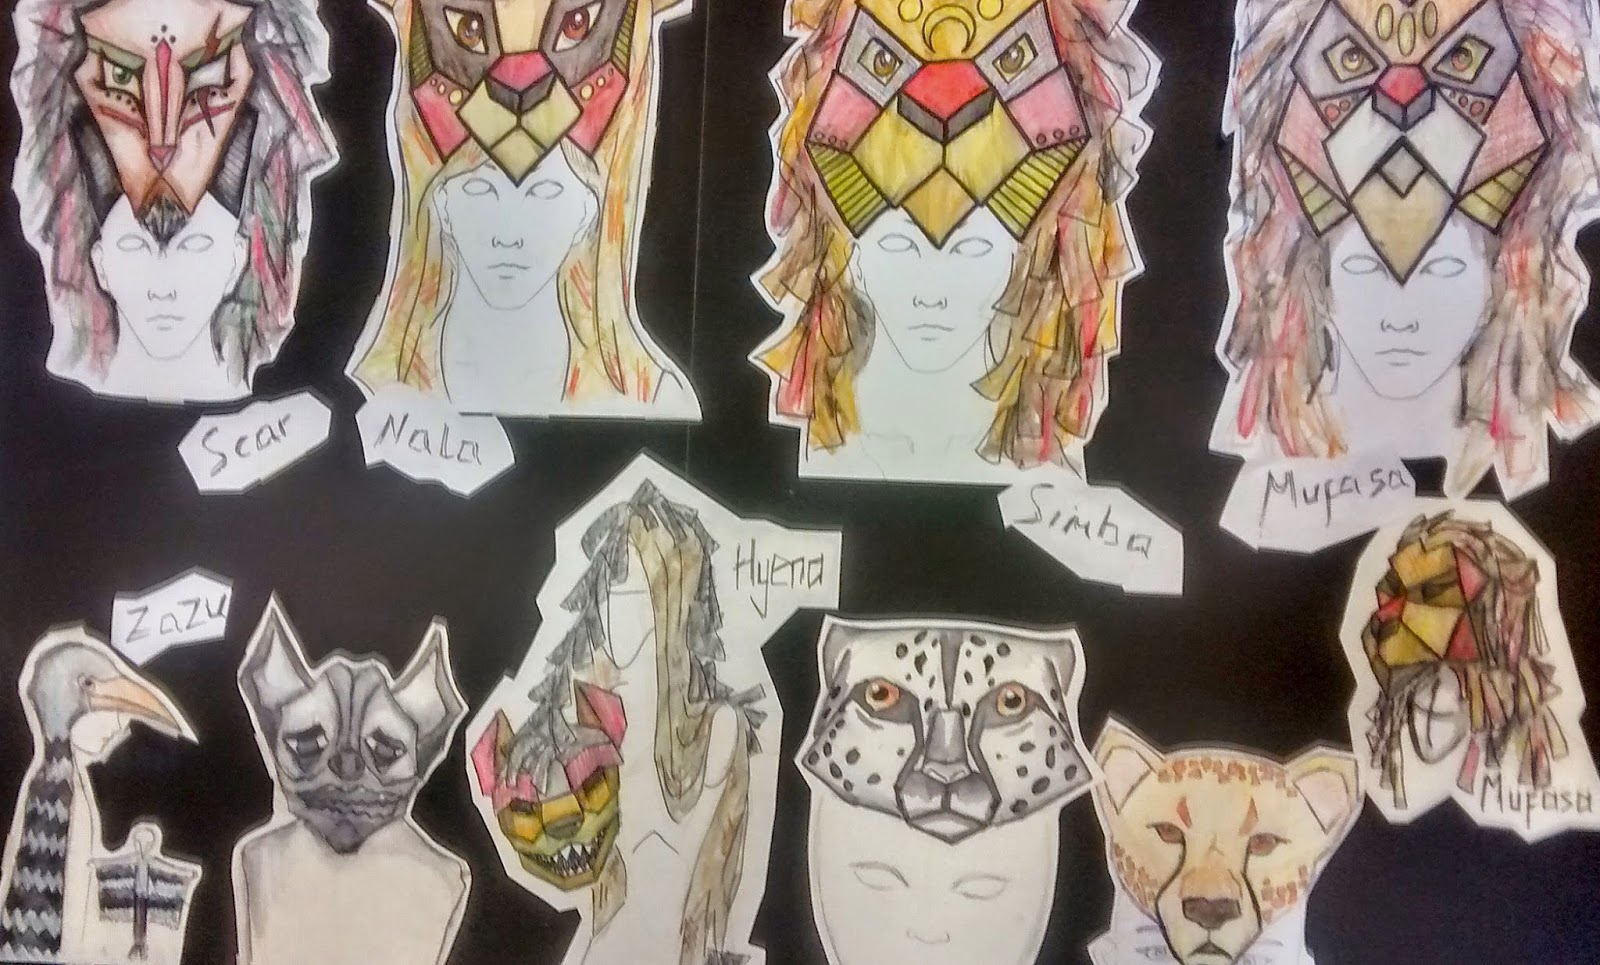
Excuse the poor quality photos - my designs include Mufasa,
Simba, Nala, a hyena and the zebra.

Jasmine: Simba, zebras, leading hyenas, leading elephant.
Amy: Mufasa, giant Mufasa, costume/fabrics, elephant, Zazu.
Claire: Scar, costume/fabrics, hyenas, elephant.
Becca: Leading Pumba, giraffes, elephant.
Oliver: Pumba, giraffes, cheetahs.
Rhian: Timon, leading cheetahs, elephant.
Tasmin: Leading zebras, antelopes, cheetahs, elephant.
Shona: Leading antelopes, zebras, elephant.
Kristina: Zebras, antelopes, giraffes, elephant.
Lorraine: Costume/fabrics, cheetahs, Timon, elephant.
Esmé: Elephant, hyenas.
Naomi: Leading costume/fabrics.
Melissa: Leading giant Mufasa, elephant, antelopes, hyenas.
Connor: Leading bird kites, costume/fabrics, elephant.
Andrea: Nala, leading Zazu, hyenas, elephant.

The next step is to start refining the process of making the masks. We have toyed with materials a lot - the possibilities as of current stand at layered gum tape, gum tape over a cardboard structure, rhenoflex and possibly vacuum formed plastic for some of the simpler mask shapes.
Whilst gum tape and cardboard would be cheap, I'm not sure if we will be able to make it sturdy enough for use by children yet. Rhenoflex would be great, but it is quite expensive - the budget will have to be revised and considered.
Here is my first design for the elephant, which I sketched out initially whilst we were watching the girls performing it at MidKent.
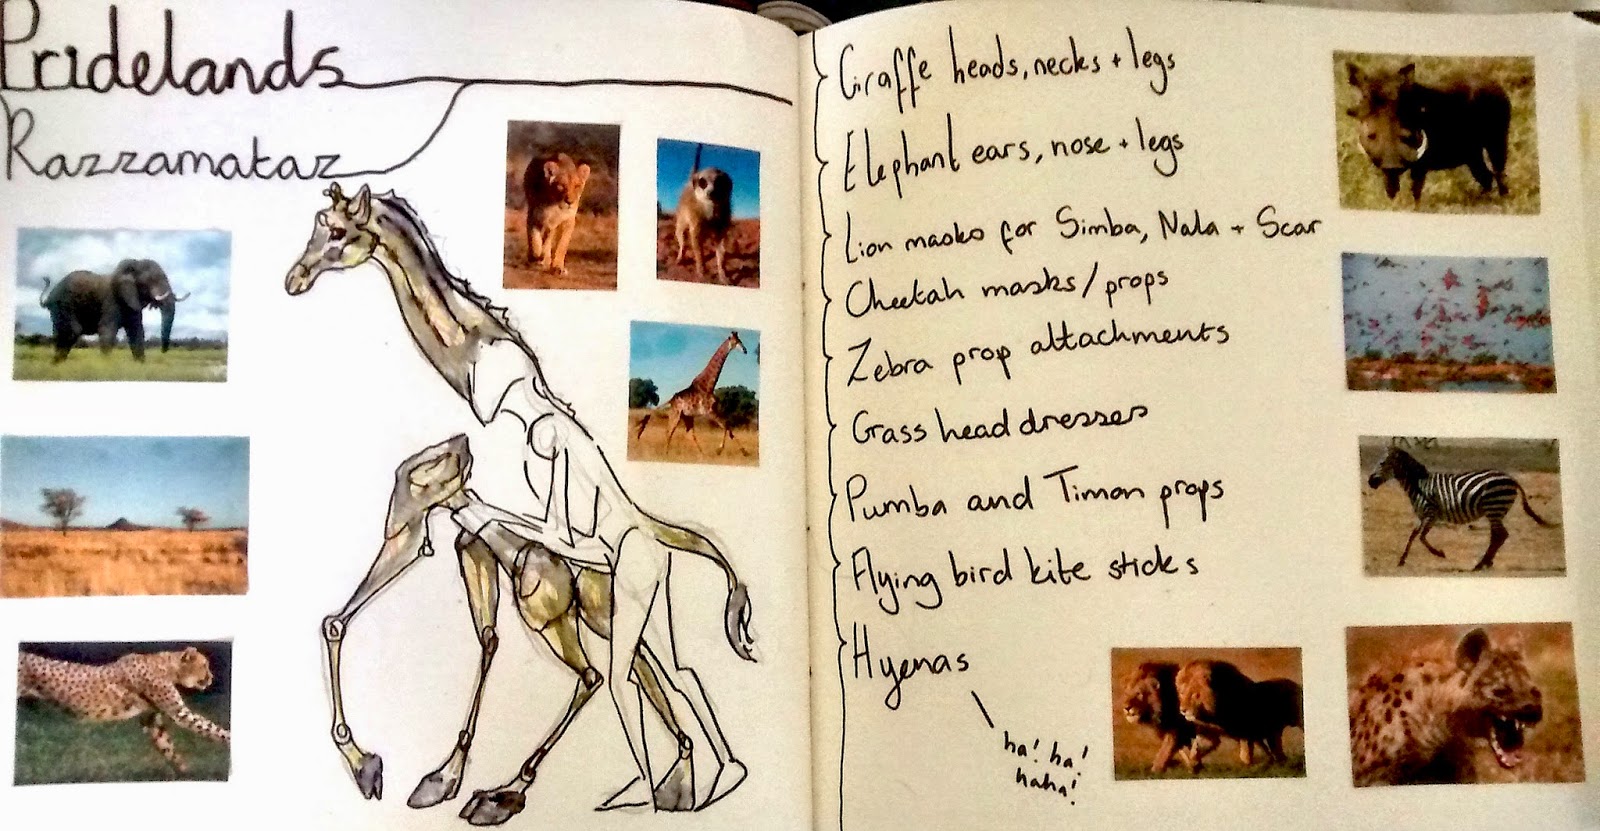
The first drawing I did for this project, before we even had the brief - a one person giraffe. Sadly benign as a design
with the news that the giraffe will be a person with a child on their shoulders, therefore they will not have any
hands free. Certainly a challenge for the group to design!


Tuesday 17 March 2015

Making Baby Simba

After watching the Razamatazz group rehearsing, I couldn't help but note their lack of anything to use as a baby Simba prop whilst rehearsing the first scene. Therefore, I decided I would make a maquette that could potentially be used as a Simba prop, dependent on how well the techniques worked.
I started out by balling up some newspaper in the rough shape of the lion's head, and piecing it together with masking tape to form a rough muzzle. I also found some paper rope left over from an old project and nestled this deep inside the paper structure, providing a secure anchor point for the head.
Once I was happy with the head shape, I made some simple ears out of corrugated cardboard, and Claire attached these with a little PVA. We then covered the head in a couple of layers of newspaper papier maché and finished the look with gum tape.
The head with ears attached. You can see the paper rope anchor and
test body shape made of stuffing.
Testing the head before it was gum-taped with the faux fur paws.

I then went on to make the body, drafting up a simple 2-piece body pattern out of paper, then tracing it onto some scrap calico I found in the costume room bin. I sewed it together on the machine, using a running stitch. I also found some brown faux fur fabric and leftover toy stuffing. I considered adding sand to weigh the body realistically, filling two nitrile gloves with sand and tying them off, but they proved too heavy, so I later resorted to just stuffing. I also made a simple 2-part pattern for the front and back legs, and once I had sew and stuffed this used thread to make the individual toes, trimming down the fur with scissors.

The head and fur legs with the test body. Because it had the
 sand in it, it was realistically heavy - but a little too heavy for the
young actors to easily hold above their heads for an
extended time on stage, as we saw in the rehearsal. 

After I had sewn the body together, I fed the paper rope anchor from the head into it and stuffed the remaining space. I sewed the neck through the paper rope so it was secure, but it looked a little thin. I then sewed on the legs by hand, using a button to give them more detail and cute charm. To solve the problem of the thin neck, I used some thin cheesecloth material to make him a neck ruff, gluing the base of it onto the head and gathering the remaining fabric up with a needle and thread by hand before sewing it onto the body. I also added a sweet little plaited scrap tail with a fur tuft on the end.


After I had painted the face with acrylics reflecting some of the tribal markings and colours I had researched earlier, I handed baby Simba over to Claire for his body to be dry brushed. She also used acrylics and a mixture of stippling with a sponge and brushing to achieve the finished effect.

The completed baby Simba, ready to be presented to Hayley.


Monday 16 March 2015

Low Poly Dream Land

Low Poly is a style of rendering in computer generated sculptures. It used minimal flat surfaces to gain the overall shape of whatever it is representing. I love this style and wish we could effectively carve it by hand!


Low-poly render of a Triceratops head, rabbit and elephant (creator unknown). You can see from the straight
lines and harsh shapes how this head could be translated into a piece-by-piece pattern in real life.


Saturday 14 March 2015

Our Visit to MidKent College

I picked up Lorraine, Andrea and Amy to get to the Razamatazz practice at 2pm; meeting Hayley was great - she was so polite, grateful and friendly to us - it was very reassuring that we were working with someone like her.
Once we had seen the children warm up, they showed us what they intended to do for the elephant. It made sense upon seeing it in person - two girls would form the head, then they would piggyback two other girls who would hold their arms out to be the elephant's ears. Behind them were two girls acting as front legs, two girls to hold the body panels, two girls as back legs - and finally, a girl holding a tail.
The giraffe was formed of a tall person with a smaller child on their shoulders. The zebras danced across the stage, thundering in a herd, and the cheetahs slyly travelled around the moving elephant. Even though the production was in very early stages, it looked great. It definitely inspired me - I could really see how everything was going to come together with all the animals, and we got a lot of our questions answered.
Here is an example of the measurements of the actors on the day. For most mask-based costumes we took the head, neck, waist, shoulders and hips, for the respective head dress, possible shoulder draping and tail. For some other costumes, we took completely different measurements - for example, the arm length of the girls who were to hold the elephant's ears.

Friday 13 March 2015

Initial Group's Designs & Meeting


This meeting was in preparation for visiting the Midkent College campus on the 14th March to see the children performing the initial ideas for the 'Pride Lands' show. We planned to get measurements of all the children - but needed to plan out which measurements we would in fact need to take.
We had multiple questions for Hayley, since it would be our first time meeting her in person and needed a lot of elaboration on the very brief, brief.
For example, Tasmin wanted to know if the zebra costumes were to be masks, or held 'body extensions', and the 11-person elephant definitely required elaboration. A lot of people had created initial design ideas, as shown below, off the information we had been provided.
We also discussed who wished to be involved with which part of the project - people mostly designed the animals they were most interested in creating, and brainstormed initial ideas of how they could be done.
Becca's zebra head drawing.
Melissa's giant Mufasa head designs.
Rhian's lion headdress designs.
Naomi's colour and pattern ideas for Simba's fabric drape.
Shona's Antelope head design.
We also arranged to have a meeting on Wednesday the 18th, in preparation for Haley visiting the university in order to view all of our designs.

Thursday 12 March 2015

The Importance of Anatomy in the Process of Design

I took a few hours today to gather a collection of anatomical references for each of the animals we are to create in this project. With varying skill levels in regards to designing, drawing and making, I wanted to ensure a broad good level of understanding how animals' bodies fit together when the team started creating their designs for consideration. There are some animals in the designs that are incredibly specific - for example the red-billed African hornbill that Zazu is, even though many think he is a Toucan.
With this in mind, I posted the following with the several albums of images;
"I want to stress the important of anatomy in designing and creating these animals. From a professional point of view there's only so far you can go when stylising a real animal without it looking 'off' if it's real anatomy is disregarded. The animal's shapes, joints and muscle groups should all be considered when it is modified to become a costume, mask etc etc.
To help with this I'm adding a series of anatomical and photographical reference images for each of the animals we have to create. Hope it's helpful, check the 'photos' tab for albums!"


A few more anatomical example pictures under the cut! I have not included all of them - there are around 5 for every animal - a few too many for a blog post.

Monday 9 March 2015


My designs for the Lion head dresses, with the first Mufasa being my first drawing for this project.
It was considered that we may do Baby Simba, Baby Nala and Simba’s mother but unfortunately the budget did not allow this.

We aimed for a geometric design as discussed to make the masks look quite refined, and to stay far away from the cheap plastic costume shop animal masks. However whilst this style looks great in drawings, I’m not sure how easy it will be to translate them into 3D sculptures and as such we may have to stray from this somewhat, whilst retaining as much of the stylisation as possible.

Saturday 7 March 2015

The Beautiful Tribes

As well as researching animal anatomy our group looked at tribal designs and traditional bodypainting, fabrics and jewellery. There are some truly stunning examples of the varied bright, colourful, expressive adornments tribespeople wear, that I'd love to capture in our masks.

The Hadzabe tribe enjoy colourful prints on their fabrics and
colour blocking in their body paint. A lot of these tribes seem
 to share a love for bold, contrasting colours - especially the 
primaries red, blue and yellow - accentuated with 
bright whites and warm oranges and yellows.


These examples of the Luo tribe offer a lot of
 dramatic headpieces, sometimes fanning out.
These look powerful and imposing, perfect
to represent the strength of a lion. The finger
 painted designs would also look great from
 afar - especially the audience's distance away.


Four examples of the Masai tribe, with a lot of emphasis being 
based on the red facial markings and bright read clothing. 
Women sometimes cover their hair with the 
smooth red mud, creating thick, shiny locks.


Thursday 5 March 2015

Julie Taymor, Designer: In Focus

'The Magic Flute', directed by Julie Taymor
Julie Taymor is a well-known director and designer for theatre, opera and film. Her work is widespread and popular, and for good reason. Her designs are bold and innovative, and often involve larger-than-life figures - such as the bears above from an interpretation of Mozart's 'The Magic Flute'. The bears look weighty and solid due to their large size but in practical terms are lightweight and flexible via their simple cane and fabric construction. Her creations hold a passion for the boldness and drama of the stage, pushing designs to the limit of the environment's physical boundaries to create a fulfilling and exciting production every time.

Taymor's work showcased in Spider Man: Turn Off The Dark
Taymor is best know for her work on the musical adaptation of Disney's 'The Lion King' and I can't even pretend to not be inspired by it - even if it is the production people first jump to when Taymor is mentioned. It was one of the first musical theatre productions I ever saw, and jump started my love for the energy and style it contains. Her designs are inspirational, playing off the strengths and weaknesses of the characters to produce costumes that compliment the play's script and musical numbers.

Not only does Taymor have the vision to direct, but she is also an incredibly skilled maker, creating the original sculpts for the lion's head dresses herself. It would be impossible to say this project won't be influenced by Taymor's creative output, but I also in a sense wish to stray far from it - the less immediate association people make with her work, the better. We have the freedom and in fact legally need to stray from Taymor's vision of 'The Lion King' to create Razamatazz's 'Pride Lands'; We are simultaneously overshadowed by the huge success and beauty of Taymor's work, and humbled and inspired by it.