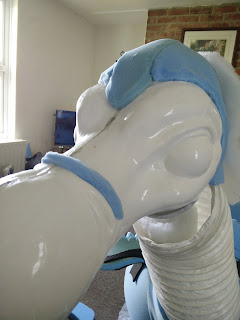
Initially I was planning to cover the head in shaved faux fur, but the clippers I had weren't making a particularly smooth job of trimming the fur down to just looking like 'peach fuzz' instead of actual directional fur. The images below show the face with the strips of upholstery foam I added as wrinkles. It also shows the fur 'cap' I've made out of grey Mongolian faux fur - it's very soft.
These pictures show the process of making the tape pattern of the head to be cut out of faux fur. It is much more time consuming on the head than the the rest of the body was, because I wanted to capture all the small details and creases. However, when I transferred the pattern to fabric and sewed it up, it just didn't look right - the fabric didn't sit flush against the plastic and the clippers hadn't shaved the fur fabric completely smooth. It just didn't look right - I wanted a smooth, soft appearance on the face but the fur just looked baggy and lumpy. I feel this may largely be because in the past I've used fur coverings on upholstery foam shapes, which smooth down under the fur and pleasingly fill out the fabric. I'm frustrated that patterning, cutting and sewing bits for this face didn't work out but at least I've found out with a good amount of time left to find an alternative.
In searching for a solution, I turned to the 'Puppet Maker's Workshop' group on Facebook where I've read a lot of interesting articles and seen a lot of great pieces of work. I got a fantastic answer from puppet maker Mathieu René of Créaturiste, as follows;
"First I'd patch the seam until invisible. Then I'd paint it in a stippling method, several coats to create a very soft surface that will look velvety. Flocking would not last very long, considering how people would love to touch that creature a LOT. Paint would determine the final look. Make sure the paint scheme is simple enough that it will not be difficult to touch up. Make sure the primer and paint bond is very strong, and that you use a very strong varnish on top, that will be easy to clean. Preferably something that resists alcohol. I use rubbing alcohol to clean my puppets before touch-ups. Fuzzier material like synthetic fur would be added near the joint with the neck to create a more subtle transition. Your creature looks like a Dodo. Here's one I built, and often perform at book fairs. He's got the type of finish I'm talking about:"
This fantastic little Dodo puppet is taken to book fairs to perform with, and the stippled face looks fantastic. It has a lot of character to go along with its extreme stylisation, and the texture on the beak is the kind of organic mottling I'd like to try on my Dodo. In order to get to this point, I spent the day removing my foam wrinkles, sanding the face, filling the seam and smoothing with acetone, more sanding - and finally, adding some wrinkles from Milliput two part epoxy putty. I haven't used this material before but it's very pleasing; it is very stiff initially, softening up when evenly mixed and kneaded, and is very pleasant to smooth with water. It takes three hours to set, so I left it overnight and sanded it lightly the morning after.
The next step is priming the face. I cleaned it with methylated spirit to remove any dust and residue, then added two coats of grey plastic primer. Here is the (currently slightly phallic) lower jaw after the first coat of primer. The stippling of the acrylic paint should help to minimise the appearance of any small flaw.


No comments:
Post a Comment