Monday, 27 April 2015

Eyes & Manes All Over the Place

Today I attached Zazu to his hat, using the same method as the lions. I also made some holes in Mufasa for him to be attached, which Claire did whilst I was fiddling with the elephant's head. Because of the shape of the Mufasa head, in order to sit him comfortably and in the correct position on the hat, there was some of the hat's band still showing. However, we fixed this after a little brainstorming by hot gluing paper rope on. This worked so well that we decided to use paper rope across the whole mane, supporting the shape of it with rhenoflex behind it.

This method worked much better than the difficulty we'd had toying with how to create scar's mane. By attaching the mane straight to the inside of the face, it removed the worry of having to create a 'frame' for the mane to sit on, because instead it was directly attached. The fabric drape could then be put inside of the mask, over the hat and upholstery foam. You can see what we had planned for Scar below, but it just hadn't been working as we'd planned.

After some scavenging I found a panel of clear vacuum formed plastic which had 12 'nubs' formed into it. I figured these would be perfect for zebra's eyes and, like the elephant's eyes, sanded the back of it and painted it with black acrylics. I used a zebra mask to make an eye template, then cut the pieces out ready to be stuck into the masks.
A pair of painted zebra eyes. They work really well because the curved, shiny surface reflects the light perfectly.


Friday, 24 April 2015

Elephant Eyes!

Here is a quick update on some elephant eyes, and Esme's fantastic progress on a zebra head. In this picture, I am gluing cardboard eyelids onto an eye lens I found in the vacuum form room scraps, which I sanded and painted the back of. The zebra mask isn't even attached onto the hat yet - the peak of the baseball hat is just folded enough to keep it within the zebra's muzzle, and I believe it will only need hot glue to make it really sturdy. The next step on the mask is gluing it in and giving them a chunky mane and their fabric necks, and for the eyes I need to paint them and add eyelashes.


Thursday, 23 April 2015

Elephant Frames & Painting Faces

Today has been progressive, but exhausting. With only six studio days left until both this project and the essay's deadline, I have been working completely flat out. I started the day by sketching out my plans for the elephant's head, then fabricating them in willow. It is a time consuming material, but is excellent for creating organic, flowing shapes with a good amount of durability.
I had some useful physical labour help in making the tail and trunk. They are simple circles cut out of some salvaged EVA foam mat, with a hole for a piece of paper rope. The paper rope is a fantastic material - it retains some rigidity whilst having a realistic swing to it, making it move realistically with a pleasing swish. It's also really cheap, which is always a plus.
The beginnings of the elephant's frame, with the trunk Emily made sitting underneath it.
The elephant's tail after being assembled including the goat fur tuft, but before the rope is painted and the backpack straps are added.
I looked at lots of anatomical pictures of elephants and their unusual head shapes in order to get a good representation of the elephant's head on the almost life-sized scale. The head has to fit two people side by side in it with the girls on their backs waving the ears, so not only does it need to be big and wide but it needs to be held on by some form of strapping. I think the next step for the elephant head is to attach the trunk, and fashion some tusks with some form of sheath to them to secure them realistically to the head.


Here is a brief timeline of the masks from the beginning to the end of the day. After spending some time on the elephant, I took a couple of hours in the afternoon to plan out and start painting Nala's head. Claire and Esme had worked on Simba and Mufasa who were looking great, however there are varying opinions on whether they look best with the gum paper showing or not showing. I personally prefer the gum paper to be covered, but with a limited range of colours in order to not over-complicate the design. On feedback of team members I am going to modify the orange colour on Nala a little to bring it down a shade of brightness, and then line her other markings with dark brown.

 Simba, with his partially raw-gum-paper design.
 My painting work on Nala for the afternoon, with the spots, eyes and lower regions still needing painting.
 Mufasa, who is personally my favourite so far. I think the boldness of his design and colour scheme works very well for the production style and character.

Wednesday, 22 April 2015

Scar's Baseball Cap Crown

After a lot of deliberation we finally managed to get Scar attached to a hat as the first working example of a secure attachment. It really was surprisingly simple - a few holes, thick thread, and a block of upholstery foam to hold the mask upright, all attached to a baseball cap with the peak completely cut off. Whilst we were worrying about balancing the masks on the peak and concerns over it drooping and overshadowing the actors heads, the simplest solution was right under our noses - or, peaks, should I say.
Scar securely attached to a hat. A huge relief for everyone involved!

Sunday, 19 April 2015

Stuffed Antelopes

It was with huge regret today that I had to take the weight of the antelope leadership into my own hands. I was really enjoying Shona working with us on this huge project but her other project has taken both her and Tasmin's time completely, so I have had to plan around this and work out an alternative to complete and duplicate the antelopes easily.
I did a lot of brainstorming - the options I came up with follow;

  • finish the styrofoam body, make a head, attach the legs and then cover the whole shape in foil and rhenoflex it for each antelope (there are six)
  • same as above, but with gum tape instead of rhenoflex
  • create a cardboard slot-together antelope in the same way that Rhian has been doing the giraffe's heads
  • create a pattern from scratch for a stuffed, soft toy type structure out of calico to be sewn together and painted
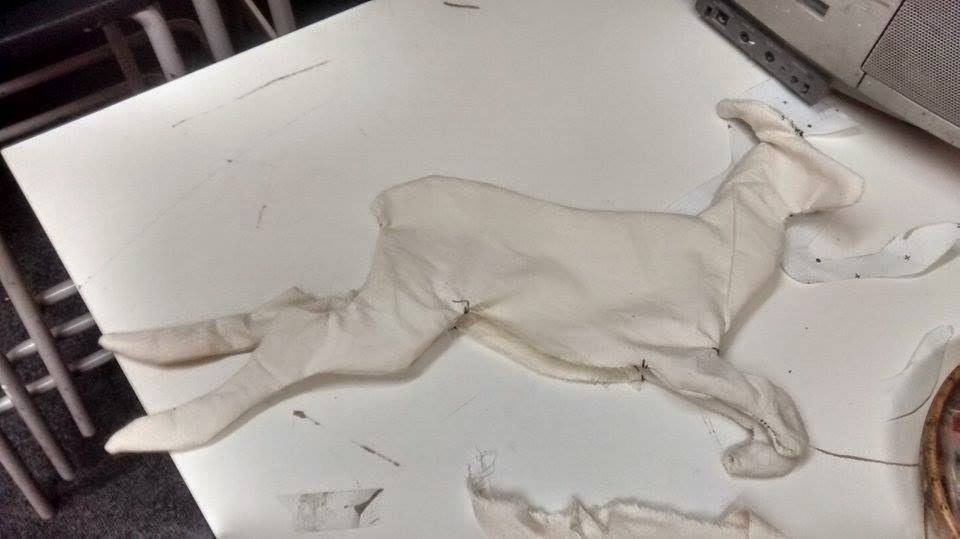
After some deliberation and input from the group, we decided the last option would be the best to play with. I drew up a simple antelope pattern, using basic skills I had from past projects in creating simple stuffed toys. I first made a 2D drawing of an antelope, then cut off the legs and horns, so they could be duplicated with a fold down the middle to create four legs and two horns instead of a totally flat 2D antelope.
My initial pattern design sketch for the antelope plush. The ears were to be made separately then sewn on after the main
body has been assembled.
The miniature test antelope. It was around 30cm long in total. Because of this small sized it proved impossible to turn
out the front legs, making it look a little bit like a T-Rex antelope. This shouldn't be an issue when the pattern is sized up!
The horns. For such a simple pattern I think they work well.
The hind legs, which have come out great. I think they may be the
best part of the entire pattern.
I have now handed this over to Naomi to size up in the traditional manner, by using pattern paper and a ruler.
Emily had some free time and decided she wanted to help our group, so I set her off on cutting out and stringing together circles of the found EVA foam matting to create a trunk for the elephant. She did this surprisingly quickly and it looked great. However, I found that when I attached the trunk to the elephant's head frame, it needed more upwards shape instead of lying totally flat on the frame - so I added another line of paper rope down the centre of the trunk. This worked really well, giving it form as well as retaining great flexibility and movement. Once I was finished with the construction of the trunk, Jake painted the paper rope grey to match the EVA foam.

Saturday, 18 April 2015

On Paper Lanterns & Elephants

Today has been busily filled with cutting and heating to form thermoplastic over the clay sculptures of the four lion's heads which are all coming along well. The 'rhenoflex' material is proving to be extremely versatile, strong and lightweight and is something I will definitely want to work with in future projects; see Nala, Mufasa and Simba below with Scar in the background;


But this evening I've been looking into some inspiration for the looming eleven-person elephant shell we are creating.
A little lost, my first port of call was willow sculptures. They are beautiful but are very built up to create the illusion of weight - we need the elephant costume to achieve this also but in a way that allows the actors to see out, whilst also being low on budget and with a fast turnaround time. The naturalistic forms that the willow creates smooth curves and tight angles that organic creatures have.

 Sarah Gallagher-Hayes' Willow Lion

Steve Manning's Willow Elephants

We will be using willow as the frame as we have with the giant Mufasa head and also the smaller, lightweight and dainty bird kites that will soar over the audience. In a similar form of lightweight structure, traditional Chinese lanterns and from this, lantern celebration sculptures. They come in fantastic, artistic forms and are the sort of thing I'm hoping the team can emulate with the willow sticks and sheer jute and muslin fabrics.

Traditional Chinese Lanterns


Dog Lantern from the 'Illumifest of Light'

'Burning the Clocks' Festival

Russell Kirk's Lantern Parade Creations

As the jute is so loose-weave it will allow the young actors to see through it with ease, so they can perform their routines without any collisions. I feel it is most important for the life-size puppet to create the illusion of form and having ease of movement. To aid this I have begun creating the body panels as two separate hand-held pieces, so the performers can allow the puppet to 'breathe' - a movement fundamental to Handspring Puppet Company, and particularly notable in their production of 'War Horse'. To be believable, the alive animal's vital signs must be met; in the haste of puppetry this mostly translates into a believable design, and movement that mimics the characteristics of the creature.


Friday, 17 April 2015

Stretching My Rhenoflexing Fingers

Today I tried using the rhenoflex myself for the first time on the finished sculpt of Nala. I first covered the sculpt in small, contoured pieces of foil to protect the buff clay underneath and stop it from cracking from the heat of the gun and plastic. It can be challenging because it is so hot - using heat proof gloves is only relatively better than getting burnt, because they are so huge that it's difficult to have the dexterity to even pick the pieces up, let alone form them - and the adhesive in the rhenoflex loves to stick to the fibres in the glove's material.
Regardless, I set about patterning Nala's finished sculpt by holding newspaper over the area that I wished to cover, then using a thick marker to feel out the edges of the shape. This was then cut from the plastic, heated up and formed onto her.  I found it easiest to join pieces by using a wooden tool to press the edges of the top piece of plastic into the lower piece, melding the two together.
Nala after being covered in aluminium foil to protect the sculpture.
Cutting out the upper nose section of Nala's head. The rhenoflex cuts fairly easily with scissors.
The first three pieces of Nala's head formed over the sculpt and attached to each other.
I also did a paint test on the sample Fiona had created to show us how to use the thermoplastic. She had shown us the process on Lorraine's antelope head maquette, and I wanted to use it to help us decide how to paint the finished pieces. I covered one side of the piece in gum tape, and left the other side raw, just coating it with a layer of acrylic. From this it was clear that we would have to cover all of the masks with gum tape - it looked so much neater and smoother, as well as being more natural and a more appropriate base colour than the light, slightly glittery blue of the rhenoflex. It also proved quite difficult to get an even coating of paint on the raw rhenoflex surface; the embedded mesh made it too easy to create inequalities if the paint either pooled in a section of mesh, or bubbled over the surface and popped, leaving it bare. It would have taken many coats to get a good covering.